

Posted on May 17, 2020
Alien Science Post-mortem
Adventure Jam 2020
You can find the details here.
And my entry Alien Science here.
Initial idea
The initial idea I had was this:
You live alone in a little cave high up a cliff, in a very foggy rainy climate. You’ve never seen anyone else, and you assume this is all there is. You go about your daily tasks (eating, collecting water, defending the nest from bad animals). One day, the rain stops. The next day, the clouds clear.
You spot someone just like you on a cliff on the other side of a chasm. They are also going about their daily tasks. The gameplay would involve learning how to communicate with them, helping them, and getting them to help you (you string a lightweight line across the chasm to ferry supplies). It would finally result in you being able to cross to the other side. They run into their cave. You follow them. You end up inside your cave. Was it just you all along?
It seemed a bit somber, and I couldn’t figure out how to implement the puzzles (especially learning how to communicate with them).
Then late at night on day 1, I completely rewrote the story to be one of alien abduction. I needed something lighthearted. And I had come up with something I was pretty happy with, which included a couple of surprise moments. So time to actually start on the jam…
Alien language
On the 2nd day, not yet having finalized all the puzzles, I decided to put that off and work on some garbled alien language simulation. I recorded myself making a bunch of weird noises. Then I isolated them all in my video editor, and exported them as separate audio files for import in Unity.
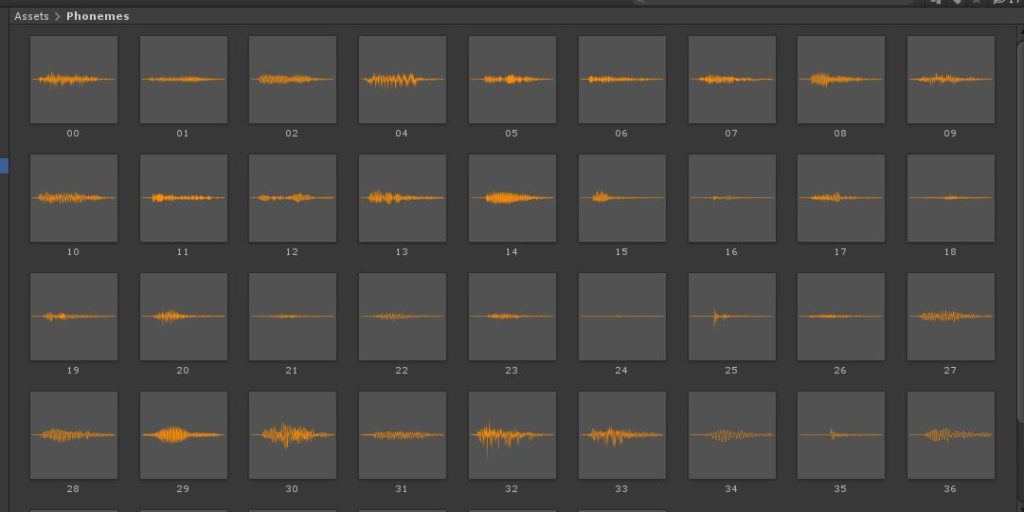
Then at runtime, when presented with a string, I break it into words, and then 3 letter chunks. I calculate a hash from these small chunks and use it to index into an array to choose a phoneme. I roughly classified half the phonemes into consonants and the other half into vowels, and then I alternate between them. Each phoneme is blended into the adjacent ones based on where it starts “being loud”. The result… kind of sounds like predictable alien speech.
I also tried to insert pauses to correspond to punctuation in the input text, but couldn’t get it quite right. The same goes for my attempt to shift the pitch throughout a sentence. At this point I’d already wasted enough time on something that wasn’t super essential, so I called it good enough.
Abduction room
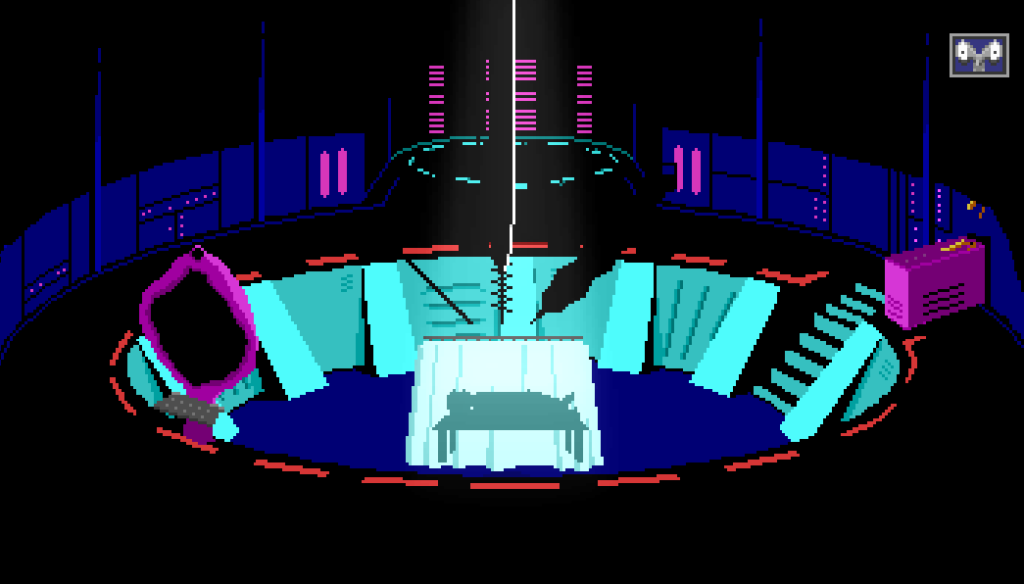
This is the first scene in the game where you can control the character. This took way too long to implement. Part of it was just re-familiarizing myself with my adventure game framework after having not used it for so long. But I think I spent nearly 3 days coding up all the stuff in this room. (This worried me, but luckily the other rooms ended up being much simpler).
The challenges were:
- 3 separate movable abduction tools on a separately movable main arm
- a screen that showed a magnified view of which orifice you are abducting
- some sort of console/UI that supports keyboard and mouse control of said abduction tools
- smooth transitions in and out of using the console
- 2 separate but overlapping pathfinding zones, which you can sometimes walk between but not always
- a relatively long cutscene
- 3 aliens providing live commentary on your work
- a bunch of timed hints, since this is the opening of the game and I don’t want the player to get blocked
- the ability to go from a standing movable player character to one lying still on a bed
- some slightly complicated stencil effects (I had to re-familiarize myself with how I’d implemented that functionality in my framework)
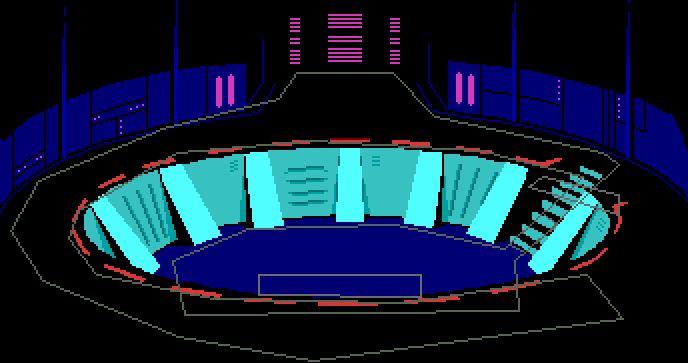
The abduction room has multiple overlapping pathfinding zones, depending on if you’re in the pit or on the walkway above.
I struggled with how to show the abduction tools. I originally wanted large complicated scary-looking things, but I didn’t really have time to draw them properly. So in the end I decided to just make them silhouettes – this saved time and actually helped with the atmosphere a bit?
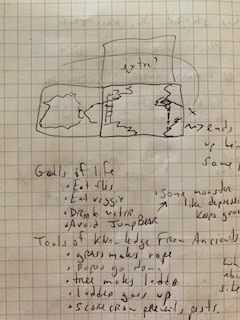
Rotoscoping
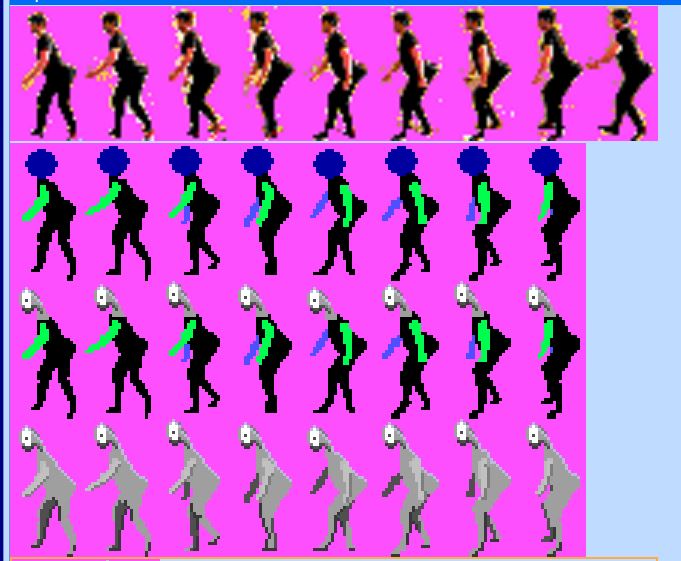
This was (I think?) my first attempt at rotoscoping. I wanted to do that for both the alien and human sprites, but I waited until near the end of the jam to do the human, and there just wasn’t enough time. So I ended up re-purposing and modifying an old sprite.
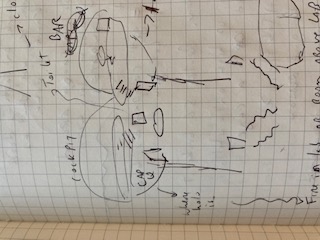
For the alien, I first sketched out some ideas on paper.

Alien with ample buttocks
The entire rotoscoping process took about 4 hours. It was pretty tedious, but it went ok for my first attempt. I’m sure there are a lot of workflow improvements for those with more experience.
Various stages of cleaning up the original video frames
Ship layout
I spent a while figuring out different possible configurations. I had a lot of constraints, which helped. Specifically, I wanted to be able to use the same sprite for all doors, so I wouldn’t have to draw them a various angles. The captain’s quarters needed to be adjacent to the laboratory for story purposes. Maybe four or five days into the jam I settled on what ended up being the final (somewhat unusual) configuration (I did end up shuffling some rooms around). Figuring out a layout and a “philosophy” for the layout of the ship helped a lot with placing elevators, doors, etc…
What went well
I figured out most of the story and puzzles within a few hours on day 1. I was able to come up with a puzzle dependency chart that didn’t change all that much.
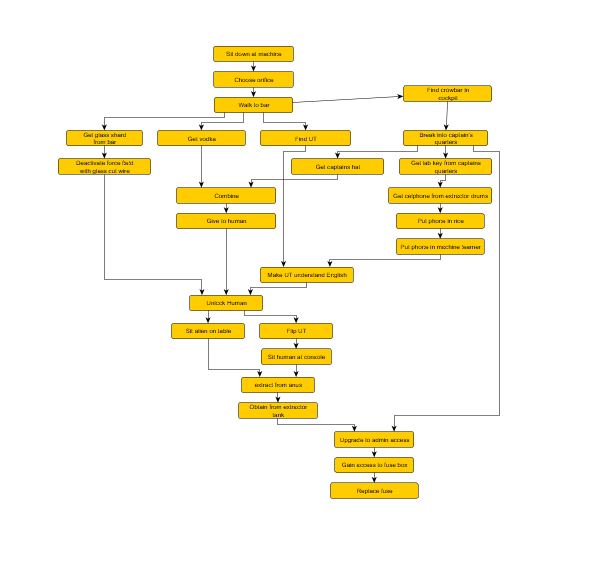
I guess this was useful, but I didn’t end up referencing it much during the remainder of the two weeks. I guess it’s a small enough set of puzzles that I could keep it in mind. I’m not sure exactly how useful I find PDC’s – They’re fine for ensuring you don’t have any dead ends or impossible situations, but I feel some kind of “knowledge dependency chart” would also be useful just for overall story flow.
I had a friend do music this time, instead of relying on royal-free music, and it worked out pretty well. He even did separate versions of the abduction music, which will make sense if you played the game.
I compiled nearly all the sound effects in a 4 hour span a day or two before the end of the jam. I started recording my own, but that was too tedious. So I just ended up purchasing most of them on soundsnap. Perhaps I should have asked in the jam’s sound design channel on discord, but it was a bit late for that.
Overall workflow
After spending much of the first week on four things: 1) a story that I ultimately rejected, 2) the abduction room, 3) alien speech 4) rotoscoping the alien sprite, I finished things off in the following order:
- I did very rough passes on all the rooms in the ship (there are six). Enough to make them just barely functional: doors/elevators in and out, pathfinding boundaries and rough shape. But now I could walk around the ship, and it finally felt like a bit of a game
- Then I implemented the majority of the puzzles. When there’s so much to do in so little time, I usually find it better to implement tons of stuff without really testing. Then I test all the new stuff in one pass.
- Then I started polishing up the art in the rooms, along with the art for the inventory items and other props.
I sent a build out to four friends about 12 hours before the deadline. Playtesting is actually pretty exhausting from a developer’s point of view – there’s so much data to sift through. It’s hard to concentrate on anything else when getting feedback, so it was good that all four playtests were done within a few hours. Then I had another nine hours or so of reacting to that feedback… fixing bugs and redoing some things. I also had to test that actually builds worked.
I ended up submitting a PC build about an hour before the deadline. Then I went to sleep, and made a WebGL build later in the day.
Posted on February 23, 2019
More verb handling tidbits
As promised in the previous post, I said I would discuss some of the other features in my verb handling framework.
Strong nouns
Often there are multiple objects of the same type in a room. A common scenario is two doors. With nounless support, you can move the player over to a door and just type ‘open’, and it will work.
Similarly, you could type ‘open door’, and it will by default match against the one that is closest to the player (or closest in their field of view, rather). So generally this does what you expect.
Additionally, when you add more descriptive qualifiers to a noun, they are generally ignored. So when typing ‘open the front door’ or ‘open the stupid door’, the parser will still just match against ‘door’. That extra flexibility makes the parser more flexible and fun to use. We just try to glean the general intention.
However, sometimes you want to be more specific. There might be a green button and a red button. By default, the noun associated with each object will just be ‘button’, so that ‘push button’ will work with whichever button is in front of you. But typing ‘push green button’ when standing in front of the red button will end up matching against the red button. Not what we want.
So in addition to the noun that is associated with each in-game object, I have added the concept of a strongNoun that has additional qualifiers. These aren’t commonly used, but the verb handling logic will first look for any objects that have these and try matching against them first. Then if none are found, it uses the regular noun.
The noun for the front door is ‘door’, but the strongNoun is ‘front door.
Alternate nounless handlers for general locations
This is something I’m still experimenting with and still changing, but I’ll describe what I have so far.
It was motivated by the common scenario where there might be something on the ground that looks interesting, but you don’t know what it is. Or perhaps something on the ceiling above you. The typical nounless support in Cascadia Quest will work by sorting objects in the player’s field of view. But something on the ceiling will likely get lower priority than an object right in front of you. So just typing ‘look’ won’t describe the interesting thing on the ceiling above you.
Now, you could explicitly handle “look up” or “look ceiling”, and then check to see where the player is and try to describe any objects that you know are up there. But I’d rather have a more automated version of this.
So I now have a mechanism where an object can be tagged as being “on the ground”, “up”, or “on a wall”. So when the player types ‘look up’, for instance, it will be treated like a regular nounless ‘look’, except the matches will be limited to those objects that are tagged as being “up”. Likewise ‘look at the ground’ will be a ‘look’ limited to objects tagged as being on the ground.

The logo on the floor is tagged as being on the ground, and the lights on the ceiling are tagged as being up.
This is still a work in progress, and isn’t trivial. The game world isn’t really 3d, so that makes things a bit more complex since I don’t necessarily have a reliable sort order for objects above you or below you.
Along with this, I’ve made a distinction between vLook and vNounlessLook. By default they are treated the same (see the last post, about remapping verbs). But sometimes you might want to offer a different description if the noun wasn’t supplied. For instance:
‘look at ground’ -> You see what appear to be footprints.
‘look footprints’ -> The footprints look like they were made by a large animal.
A more flexible implementation might be to create a new object that represents ‘up’ (or some other open-ended spatial concept), and have the appropriate regular objects associated with it. Basically associating each regular object with a spatially aware thing that the parser can recognize.
As I continue building the game, I’ll see what scenarios arise and how I might address them.
Player zones
A scenario that has occurred fairly frequently in development is where there is an object on screen that the player can see and somewhat interact with, but that they are not physically able to approach (for instance, it might be out of reach up on a cliff).
This is such a frequent occurrence that I built some functionality into my framework to try to handle this automatically. Each object (including the player character) is assigned a player zone. An object can be present on more than one player zone (so it is a bitfield). By default every object is in player zone 1, so there is nothing special to do.
But in rooms where there are physically separate areas (e.g. up on top of a steep cliff vs. on the ground down below), each object is assigned a different zone. You can still interact with objects in a zone different than the player if the verb you use is a far verb for that object. But if the verb is a near verb, the game will automatically pop up a message saying something to the effect of “You can’t get to [insert object name] from where you are.” An object can customize the message if necessary. For the most part though, this requires little work on the part of the developer (me) – just correctly assigning player zones for each object.
In this case ‘look’ is a far verb, and ‘get’ is a near verb.
Unsolved challenges
Although the grammar parser in most cases supports identifying the order in which items are referenced (e.g. “give cat to dog” vs “give dog to cat”), I pretty much ignore this once I convert it to my verb/item/item format. This means that it is either up to the dog object or the cat object to handle vGive with a cat or a dog. If one doesn’t handle it, the fallback handling will eventually try the other object.
So of course what happens in the end, is that we’ll use verb metadata (such as whether this is a near or far verb) provided by the object that does handle it, and that could have some unintentional side effects. Nothing insurmountable, but it’s not a fully fleshed out area.
Another unsolved issue I have is with approach positions for moving characters. Most objects are fixed, and they tend to have a specific position on the screen that the player will move to when a near verb is used with that object (like “get grapes”). For NPCs that move around, however, the approach position may not be a fixed point. I currently don’t have any support for this, so I either don’t use any near verbs on NPCs, or I assign a fixed position that is roughly close to the locations they are patrolling or moving around. Ideally (I guess?) I would have the option of making the NPC stop and face the player, and then dynamically assign an approach position the NPC. This gets a bit tricky though, because I need to make sure that the approach position is in the pathfinding area that the player can walk to.
Posted on February 18, 2019
Verb handling in Cascadia Quest
In this post, I’ll go over some of how verb handling works in Cascadia Quest (as opposed to my older game Snail Trek).
The problem
Given that the bulk of the game consists of responses to actions on items, I need to make sure that the process of writing those handlers is as simple and non-bug prone as possible.
There is more to a verb handler than just the code that responds to it:
- There also needs to be some metadata about the verb on that object – mainly, does it require the player to approach the object or not? ‘look’ might not, but ‘get’ usually will (but not always – it depends on the object).
- We would also ideally like to know if the verb can be used “nounlessly” with the object. For instance, if there is a door and a button in front of the player, ‘open’ can be used nounlessly with the door, but not the button (but you could still type ‘open button’ and expect some kind of fallback response).
- Some verbs that are normally treated as synonymous need to be treated separately on certain objects. ‘look’ vs ‘look in’ is one example. There are more that will be listed later.
The made-up language I’m using did not have a good way to declare verb metadata, so I was left with implementing other methods on an object that would return the necessary information about a verb (e.g. does it require approaching an object). It was much too easy for this to get out of sync with the actual verb handling code.

Far verbs vs near verbs (in this case, look vs get)
Additionally, the verb handling code was a basically a series of switch/if/cond statements. Writing logic like that, while straightforward, tends to lead to bugs. A more data-driven approach would be better.
Here’s an example of the old way, from the funny hat dispenser in Snail Trek 2:
(instance hatDispenser
	(method (remapToCoreVerb verb)
		; Normally vLookInside is mapped to vLook. I need to declare that it shouldn't be for this object
		(if (IsOneOf verb vLookInside)
			(return verb)
		)
		(return vNone)
	)

	(method (isApproachVerb verb)
		; Need to remember to put all approach verbs here
		(return (IsOneOf verb vUse vPut vLookInside))
	)

	(method (doVerb theVerb item)
		(switch theVerb
			(vKill
				(Print "If you break the machine, there will never be anymore funny hats.")
			)
			(vGet
				(Print "Don't get greedy.")
			)
			(vLook
				(Print "It's a small machine mounted in the wall that says \"Funny Hat Dispenser\".")
				(Print "It has a small coin slot.")
			)
			(vLookInside
				(Print "You peek inside the coin slot, but don't see anything.")
			)
			(else
				; Logic getting a little complicated here
				(cond
					((or
							(and (IsOneOf theVerb vUse) (== item nNothing))
							(and (IsOneOf theVerb vPut vUse) (== item coin))
					 )
						(InsertCoin)
					)

					(else
						; Need to be sure to forward onto the default handlers
						(super doVerb: theVerb item &rest)
					)
				)
			)
		)
	)
)
The solution
Given that I have control over the language, it seemed to make sense to modify the language to support my needs – basically bubbling up the game logic requirements into the language syntax. The less friction between intent and implementation the better.
I didn’t do anything complex like change the compiled language structure to add metadata. Instead, I just made the compiler take the new syntax and convert it behind the scenes to a series of methods that works the old way.
Here’s the same object above, converted to the new way:
(instance hatDispenser
	; all these verbs will automatically be tagged as 'make player approach'
	(nearVerbs
		(vLookInside
			(Print "You peek inside the coin slot, but don't see anything.")
		)
		(vUse
			(InsertACoin)
		)
		(vPut, vUse -> coin
			(InsertACoin)
		)
	)

	; these work from a distance, but will be tagged for nounless support
	(farVerbs
		(vKill
			(Print "If you break the machine, there will never be anymore funny hats.")
		)
		(vGet
			(Print "Don't get greedy.")
		)
		(vLook
			(Print "It's a small machine mounted in the wall that says \"Funny Hat Dispenser\".")
			(Print "It has a small coin slot.")
		)
	)
)
In addition to being more terse, all the metadata for the verbs is inferred by inspecting the code. The compiler can generate the appropriate code behind the scenes that will inform the framework about all this at runtime.
A small side note: by default, any verb that is handled is considered as a candidate for a nounless verb (meaning you can omit the noun if you’re standing in front of the object). This can still cause issues in some cases: say you have two objects in front of you, and you can only actually ‘get’ one of them. But I wish to have a (perhaps funny) response for trying to ‘get’ the other one. I have not yet implemented any syntactical solution for this (I can still override the appropriate method on the object to solve this though).
Some more details
In each verb clause in a nearVerbs or farVerbs section, I can declare a number of verbs and items. For instance:
(vPut, vUse -> nMushroom, plant
;stuff
)
This will handle trying to put the mushroom or plant in this object, or using the mushroom or plant with this object.
The items supplied can be inventory items or other objects in the room. If no items are supplied, then it’s a handler for when the player just uses that verb with the object (nounlessly or noun), with no other objects mentioned:
(vUse
)
Note that in the old way, in this scenario it was very easy to forget to explicitly check that no item was supplied to the verb handler. So ‘open elevator with crowbar’ would be treated the same as ‘open elevator’. Sometimes that is desirable, but when that is the default behavior some issues can arise – especially with nounless matches. For instance, consider the case where there are a box and an elevator in front of the player. They type ‘open elevator’, but the box is closer to the player, and we do a nounless match with the box (which supports ‘open’). The result is that the box’s verb handler will be called with vOpen and elevator. Yes, I do nounless matching even when a noun is supplied. This is how you can walk up to Christian and type ‘ask about Shelley’ (turns into ‘ask Christian about Shelley’), or how you can stand in front of an engine and type ‘put fuel’ (turns into ‘put fuel in engine’).
In the case where we really do need to handle any item that is supplied, we can do this:
(vPut -> *
)
Then there is an implicit ‘item’ variable we can reference to identify which item was said (if we care).
Verb remapping
The verbs in Snail Trek and Cascadia Quest work on multiple levels.
First, there is a mapping from the typed words into conceptual verbs. This is handled by a grammar parser and isn’t always a 1-to-1 mapping. For instance, all the following typed phrases will be mapped to vEnter: ‘enter’, ‘get in’, ‘go down’. Or, vTurnOn can be ‘turn on’, but also ‘switch on’ or ‘start’. This minimizes the complexity of the code I need to write, and ensures consistency when performing actions on different objects. I’m constantly changing these as I develop the game and need to distinguish what were formerly the same verb. Currently in Cascadia Quest there are about 440 recognized grammar verbs, and these are mapped (often along with prepositions) to nearly 100 different conceptual verbs that I write code against (stick that in your point-and-click UI!).
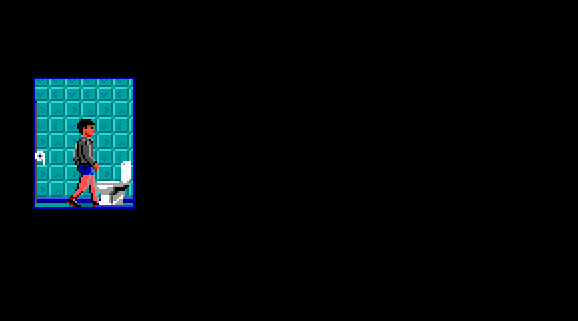
Many different intentions for jump. In some cases we want to differentiate (the toilet), in others (the fire) we treat them all the same.
It’s often useful to distinguish conceptual verbs in some cases but not others. For instance, looking at a bed might result in a different response than looking under the bed. So there are multiple look verbs: vLook, vLookUnder, vLookInside, vLookBehind, vSearch. By default, these will be mapped to the first one, vLook. So a cupboard, say, can just have a vLook handler, and ‘look in cupboard’ will just result in the cupboard’s vLook response. But if a nearVerbs or farVerbs explicitly handles one of the others, then we will automatically make a distinction.
In the old way, I had to write additional code to tell the framework not to automatically remap these conceptual verbs to the more core set of conceptual verbs. You can see that in the example posted earlier in this post:
(instance hatDispenser
	(method (remapToCoreVerb verb)
		(if (IsOneOf verb vLookInside)
			(return verb)
		)
		(return vNone)
	)
)
Other examples where this remapping currently happens are: vKill (vCut, vHit). Or vJump (vJumpOff, vJumpOn, vJumpOver).
The next post will go into more detail on some of the subtler verb handling issues.
Posted on May 20, 2018
Hints for Snowspirit
For Adventure Jam 2018, I created Snowspirit. If you need a bit of help getting through it, here are a few hints. Highlight/select each bullet point to get ever more “spoilery” hints about a problem.

Hints
What am I supposed to do? I’ve run out of things to do
- Try to make it snow again.
- The tablets are the key.
- One is a recipe.
- The others hint how to get ingredients.
- These ingredients aren’t in the real world.
- These ingredients aren’t in the real world.
How do I escape reality?
- What happened when you first woke up from your dream? Something fell off your stalactite.
- Find other things to put there
- Go to sleep!
How do I wake up from a dream?
- Just step into the light!
How can I bring things back from dreams?
- You can’t
- But… important items you pick up while dreaming might have real world effects or manifestations…
What am I supposed to do in the forest?
- That’s easy one. Just get some water!
- You might need to revisit it later though.
How do I get to the third (probably?) dream?
- You have what you need. What do you have? What haven’t you used? What’s it made of?
- Just need to transform it a bit.
I’m in space and I’m stuck
- Pay attention to the light
- Notice that items in the dreamworld can’t be brought back to the real world, but they do transfer between dreams
I need a flower!
- If you don’t even know where to look, see the “third dream hint” above
- Everything in that room is important… so read the descriptions for everything.
- Where is that light coming from?
- Maybe from a previous dream?
- There’s a little water. What’s the water doing? What if there were a lot?
- You might need to do stuff in another dream with something from yet another dream.
I did everything and it’s barely snowing….
- Put all the ingredients in the pot? That would be a good start.
- What’s on that fourth triangular tablet? Hmm, you can only see a bit of it…
- At least it tells you how to get to a dream…
Posted on October 25, 2017
Overlapping path finding regions
I found myself wanting to have stairs and walkways that appear on top of other walkable areas. I had avoided this up to this point because of issues with pathfinding.
While the A* algorithm I use for the actual path finding isn’t limited by two dimensions (it works with any node graph), the game world and base polygons I work with are 2d, and the library I’m using to combine and clip the polygons is 2d. You can find more information on this here.
Background
Consider the following room with a upper level walkway that appears in front of the stairs:

Walkway in front of the stairs.
The player can be on the stairs or on the walkway. In the room script I need to track where they are based on where they entered the room and how they have crossed through the area near the top of the stairs. It’s reasonably straightforward to do this and ensure that the player character has the correct depth value (so he/she appears in front of behind the walkway).
If I want to describe the walkway areas for pathfinding, however, I end up with something like this:

If this were true 3d, this would probably work fine. However, in 2d a point where the polygon overlaps itself doesn’t really make sense. Is it on the walkway or on the stairs? Related, my clipping library turns this polygon into this:

Now it’s no longer ambiguous. However, we can freely walk between the stairs and the walkway without going through the upper stair landing.
I could possibly selectively place blockers depending if I detect the player is on the stairs or walkway. But that’s a lot of manual work, and I want a slightly more rigorous solution I can use in many rooms.
Pathfinding zones
My solution is to split the room into multiple pathfinding zones. Visually, this looks like:

The polygon for the lower level.

The polygon for the upper level.
Note that these have a small overlapping section near the top of the stairs. This is where we’ll transition between the two zones.
Along with this, I added the following functionality:
- Rooms no longer have a single set of polygons that define their boundaries. Instead, they have a set for each pathfinding “zone”
- Each actor (moving sprite) has a pathfinding zone number associated with it
- I introduced a “pathfinding triggers” concept – these define small regions of the room that actors can pass through that will take them into a new pathfinding zone (this is how the actor’s pathfinding zone number is kept up-to-date). In the example we’re using, these would lie on the edges of the small transition area between the zones.
In terms of movement, the room’s polygon boundaries are used for two functions:
- To answer the question “can I be here?” for an actor. This is used when moving the player with the keyboard (or controller). In this case, I can simply choose the polygon for the pathfinding zone the actor is in, and make the query.
- To be able to find a path from point A to point B. This is used for “click to move”, for moving NPCs from place to place, and also (importantly) when typing in a command that causes you to interact physically with an object (the game needs to move the player to the object).
For the second case, we have the problem that the target pathfinding zone might be different from the one we’re currently in.
To solve this, I extended the pathfinding logic like so:
- If the target position is in the same zone as the start, do things just as before.
- If the target position is in a different zone (B) than the start zone (A), find a transition point T between A and B. Then find a path from A to T, and then T to B. Combine the paths and use this as the result.
The transition point should be inside the overlapping areas of the two zones. To avoid unnatural paths, the transition area should be as small as possible.
So the manual work to support multiple pathfinding zones in a room is:
- Define the sets polygons for each zone (of course) – they must overlap a bit.
- Create triggers on each side of the overlapping transitions between zones – these could be anything (manual coordinate checks, polygons, or control colors). Currently I’m just using control colors, which is a bitmask built into the background. Associated with the triggers in code is the pathfinding zone number they assign to any actor passing through them.
- A transition point for transitions between any two zones.
I should in theory be able to support any number of zones per room, but currently I just support two. With a little bit of extra work, the pathfinding algorithm mentioned in case (2) above could be extended to n zones (in case you need to transition to an intermediate zone separate from the start and end zones).
Note also that “click to move” is still ambiguous, because all you have is a 2d point, and you are making assumptions about which zone it’s in. In practice this isn’t an issue though. It’s completely reasonable just to make it use the zone that the actor is currently in.

Overlapping paths for the player
Posted on October 9, 2017
Dealing with a limited palette
The color palette I’ve chosen for Cascade Quest consists of the combinations of the sixteen EGA colors (to simulate the palette used by those old games, which often dithered two colors together). Since color A combined with B is the same as B combined with A, there are only 136 actual colors instead of 256. Not only that, but several combinations result in the same color, so there are really only 126 distinct colors.
This fixed palette poses a number of creative issues when it comes to choosing colors. I’ve already gone into some detail as to how I support blending two colors, but in this post I’ll talk about choosing colors from an artistic perspective.

The sixteen colors on each axis (the original EGA colors show up on the top left to bottom right diagonal). This isn’t very useful for choosing colors.

This is an attempt to organize the colors in a more useful way: hue left to right, various saturation bands top to bottom, and brightness top to bottom in those bands.
Choosing colors by specifically specifying the two source EGA colors also isn’t very easy, since the resulting color the combinations would make isn’t always obvious.
Some of the questions I need to answer when choosing a palette are:
- What other colors are similar to this one, but lighter or darker? (or less saturated, etc…)
- What other colors are extremely similar to this one?
- I need a dark area, what good color choices do I have?
Variations around a certain hue
For example, for a certain area I wanted to have an orange and greyscale palette. The greyscale colors are fairly well known, but I wanted a quick way to figure out my options for orange colors.

An orange metal tube, using colors chosen with my tool.
In the fast palette lookup post, I mentioned a quick tool I made to let me visualize my set of colors. I extended it to encompass different color spaces, and let me click on a color to get its palette index.

In addition to RGB, I have:
- HSV
- HSL
- The most useful one, what I call “perceptual HSL”, where luminance is actually the perceived brightness. The human eye responds to green light the most, and blue light the least. Thus (0, 0.2, 0) is perceived to be much brighter than (0, 0, 0.2). More details can be found here.
Here’s a screenshot showing the colors I’ve used for orange objects in the “orange and greyscale” areas:

Five “orange-ish” colors of varying brightness.
Dark colors
The dark colors are pretty limited, and my color visualizers tell me that I should probably focus on blue or purple colors if I want variety in dark colors.
Similar colors
If I want to place some somewhat hidden messages in the game – like a color that’s only slightly different from another – this let’s me easily see that.

Color $78 is one of the greyscale colors (they are arranged along a column in the middle in this screenshot), but color $36 (a mix of teal and brown) is very close, and could be useful for a secret message written on a rock, say.
I have the ability to remap palette indices, so a secret message could be made very visible with a special light in game of course (that “remaps” the surrounding area). But it’s kind of a nice touch that when it’s “invisible”, it’s still actually just slightly visible (or completely invisible if I choose base color combinations that result in identical colors – Void Quest used this somewhere, for a hidden thing at night…).
Re-evaluating color choices
I can also look at palette choices I’ve made. I use five main colors for the “summit” scenes in the first act of the game.

Rock colors
I can visualize those five colors in my tool:

The summit rock colors
You’ll note that they are all completely identical hues, which maybe isn’t the best choice. Shadows should generally be a little bluer, and highlights a little more yellow. So I might be able to find a better option (although it looks like my choices are a little limited in this region of the color wheel).
As I become more conscious about palette choice, hopefully this tool will help me out in making good decisions.
Posted on September 12, 2017
Talk Sweetly To Printer
Cascade Quest was shown to the public for the second time at Seattle Indies Expo (a PAX West side convention) on September 3rd.

The booth
Lots of space at SIX this year – they moved it to a new venue, closer to PAX and with air conditioning. Since I haven’t yet commissioned a proper poster for Cascade Quest, I decided to spruce up the booth with green stuff (since the start of the game takes place in a forest): green tablecloth, fake plants, green LED lights. And I purchased a couple of plushies based on characters in the game.
I also had buttons to hand out to folks who played the game or signed up to the email list.

Cascade Quest booth, with marmot, raven, ferns, and hand sanitizer.
Changes from last demo
I’m still just demoing the first act of the game (and I doubt I’ll change that before release). I had reworked the text input system quite a bit since I last demoed it, and I thought it worked much better. I also changed a few puzzles, redid a few screens and added a couple more.
I also expanded the analytics I recorded slightly – it’s no longer just the text input, but also autosaves (upon entering each screen), screenshots, and the player’s position on screen for each piece of text input. This was in the hopes of being able to diagnose difficult-to-reproduce bugs (every bug I found was easy to reproduce though).
I also added a third demo machine since I had space on two sides of my table and I knew there were going to be more people at Seattle Indies Expo than at the retro game expo back in June. This was a good idea, since all three machines were occupied most of the time.
The stats
- Players entered 2395 rooms throughout the day
- Players typed 7067 phrases in to the game
- 5 players made it all the way to the end of the demo
- About 70 people sat down and tried the game
- About 60 players made it out of the ranger station (where the first puzzle is)
That was a lot of data to process, and I ended up spending about a week afterwards making changes to the game to address issues or frustration that players encountered.

Stations full
Some of the things people typed:
- Talk sweetly to printer (this was due to a bug in the way I handled putting paper into the photocopier in the first room – this frustrated a ton of people)
- Love the printer (related to above)
- Smash desk
- Flip desk (someone’s getting mad – perhaps related to above)
- Get some jordans so you can get hops
- git gud
I added a bunch of in-game hints to explain how the typing system worked, and that alleviated much of the frustration that new-to-text-parser adventure gamers had.
I’ve also added auto-correct, so this eliminated a bunch of frustration people had with typos.
One of the significant changes was to make your text input more context sensitive – it will infer what you’re talking about depending on what you’re near. So ‘get‘ will get the object in front of you. ‘give mushroom‘ will give your mushroom to the person in front of you. It worked a bit like this previously, but I expanded the scope significantly since the last demo.
In the original Sierra adventures, ‘look’ gave a general description of the room. With the contextual stuff, this now describes the object in front of you (or the room, if none). This seems like it was a lot more natural for people. I used my typing hint system to train people to type ‘look around’ to get a description of the room. Seemed to work well, so I think I’ll keep it.
I also added an in-game hint system, but very few people found it.

Making a hotfix earlier in the day, due to a game-breaking bug.
Some new changes
This time, there are a lot fewer big changes I needed to make in response to feedback. So that’s good.
I’m trying to formalize the conversation system a bit more, to make it seem like the characters are a little more alive. You’ll be able to ask them about topics and such (e.g. ‘ask about paper’) – this already worked in a limited fashion, but I’m making a bit more data-driven so it’s easy to add different responses to queries on various topics.
I may also add a way to identify the objects in front of you, or show hotspots. This might be part of some “casual mode” for more beginner players.
I need to make changes to the in-game hint system I implemented, because very few people found it. However, I felt it was maybe even a bit unnecessary, since I added a lot of signposting for the puzzle solutions (making the game a little less difficult).
Other notes
I added a secret death scene that I think only one person found. It made me very happy when they did, though.
I talked to lots of people who were excited about adventure games!
Posted on June 29, 2017
Seattle Retro Games Expo
At the Seattle Retro Games Expo on June 17-18, I demoed Cascade Quest to the public for the first time. It was a great experience, and a great way to get feedback from a subset of the gaming population.
The Booth

Cascade Quest booth at SRGE
I didn’t have time to commission a nice poster for the booth, so I just ended up using a large logo mounted to cardboard. The booth looks fairly cobbled together, but it was about as professional as other nearby booths, so I didn’t feel too bad. I also spent a day or two coming up with a demo mode of the game that plays through about 4 minutes of gameplay in various screens. This was probably better for attracting attention than any poster would have been. It shows lots of the text input, which I think was important.
I had two laptops set up (a good idea, since the power kept being cut the first day), one with a TV attached to it. I placed newsletter signup sheets on either side, and also had a signup form directly in the game (if you make it out of the ranger station, at which point you’re probably reasonably invested?). The in-game form ended up having slightly more signups.
How did folks react?
Even though this was a retro game expo, it is mainly focused on the 90s and early 2000s, and heavily focused on Nintendo and Sega. So I was a bit worried that it wouldn’t be the right demographic for Cascade Quest. That may have been true, but I still had a fairly steady stream of people playing the game both days. Most people who played (maybe two thirds) had played the old Sierra games before and were immediately intrigued by the similarity. For some, it was a completely new experience.
I would say the demographics for people who played my game tended towards older. They may not have been the majority of people attending the expo, but there were enough of them that it kept me pretty busy. I also had several small children (under 10? I’m not good at guessing children’s ages) play the game and enjoy it. Some were young enough that they didn’t really understand what was going on (nor were they able to progress very far), but still seemed to enjoy typing things in and seeing the responses. I did have one young girl play the demo to completion (solving most of the puzzles herself) over the course of about two hours.

Father/daughter team enjoying Cascade Quest
The good news is that I got overwhelmingly positive feedback about the game. However, I think most folks aren’t likely to give any negative feedback (critical feedback seemed to only come from other game developers). If someone doesn’t like it, they just play for a few minutes and leave (this happened a few times). But the vast majority of people played for a while and said they really enjoyed it.
Some folks were very excited, and told me I had really captured the nostalgic feel of the old Sierra games – but without the design problems they suffered from. This was really nice to hear. Many people didn’t even realize that the graphics weren’t actually EGA – they just looked that way (also my intention). And I got plenty of compliments on the graphics, which is nice for this programmer to hear.
I learned not to judge people’s enjoyment of the game by watching their expressions. Some had constant looks of confusion, anger, or frustration – but in the end said they really enjoyed it. Of course, it was nice to have people sit down and instantly start giggling at the responses the game was giving to their actions.
One person suggested (only half-jokingly) I include an object early in the game that – if you fail to pick it up – prevents you from finishing the game (of course, you don’t realize this until the end). While I am explicitly designing away those issues, this highlights the importance of keeping a good amount of nostalgia in there to appeal to older players. In that same vein, one person asked “can you die in the game?”, and was really happy to hear that deaths are indeed possible.
Analytics
The only analytics I had in the demo were tracking the players’ typed commands, and tracking whether or not the game reverted to a default response (thereby indicating it wasn’t understood). For future expos I want to be able to replay the players’ movements more completely so I can better understand what they’re trying to do.
My one regret is that I didn’t spend more time watching players play the game. I would walk behind them every once in a while to make sure they weren’t running into bugs, but in general I tried not to bother them. As a result, I don’t feel I got a good enough picture of what issues people ran into.

There’s that signup sheet lying on the ground…
It was painful at time watching people struggle with the puzzles. However, I began to realize that they should be struggling. In the end, those that made it to the end of the demo (or close to it) took about the time I had expected… roughly two hours. I want people to struggle, but I also want them to feel satisfied when they solve a puzzle (and say to themselves “ah, that’s so obvious, why didn’t I think of that?”). That’s a hard thing to gauge at a broad public demo like this though.
For some reason, players had a much harder time navigating the puzzles on Sunday than on Saturday. I’m not sure if this was just a random thing, or whether there was a difference in demographics (perhaps more hard-code players visited on the first day?)
Conclusions
People ran into a number of bugs with the demo. This told me that my object interaction architecture (which I rewrote several months ago) isn’t robust enough.
Many people praised the text parser autosuggest, but didn’t realize they could use it to actually complete words (they thought it was simply a reference for which words would be accepted). I probably need to tweak the UI a bit to make it behave more like a modern browser search box, rather than a programmer command prompt.
One thing that definitely stood out was that people expected “look” to describe the object in front of the player. Instead, a simple “look” is wired up to give the room description (like Sierra did), and you have to name the object to get a description of it. I do have the ability for many verbs (like “take” or “open”) to operate nounless, based on what’s in front of the player. It seems “look” needs to work that way too. I originally resisted this, because I didn’t want players to have to type “look around” to get a general description of a room. But the evidence was so strong that “look” needs to refer to a specific object that I will have to revisit this.
Some people thought the parser was more intelligent than it was, e.g. “tell my boss that I don’t know where to find paper”.
Other people thought it was dumber than it was. They would type “give copies boss” instead of “give copies to boss”. The problem with this is that the parser interprets the former as “give the boss to the copies” – that is, boss is the direct object, and copies is the indirect object (and we fail to get a valid response). As a result, I will probably lessen the restriction on the grammar and ignore the difference between direct object and indirect object for most scenarios (I struggle to see a situation in which both would be accepted and perform different but valid things).
Appealing to a broad demographic
I would really like to find a way to make the game appeal to a broader demographic than just those who enjoy the nostalgia. I had some success with this, but I think it’s still not accessible enough to modern gamers.
Further data to corroborate this is the ratings that Void Quest has been receiving. A lot of people really like it, but some people really hate it (a relatively high number of 1-star reviews). Unfortunately people who hate it tend not to leave comments on what they don’t like or what turned them off. So I’m basically left guessing. I have to assume that either:
- the text parser turned them off and they didn’t realize that the game they were downloading wasn’t a point-and-click
- the puzzles were too hard
I did have some people at Seattle Retro Game Expo be suspicious of the text parser at first, but then gradually get into the game once they got the hang of it. So part of it may be convincing people to keep playing long enough.
And so…
I’m currently in the process of refactoring some of Cascade Quest’s object interaction code to make it more robust and predictable. I’ll also integrate some of the puzzle feedback I got, and then begin work again on the other parts of the game.
Posted on June 27, 2017
Hints for Void Quest
A number of people are stuck on my Adventure Jam 2017 entry, Void Quest. The puzzles are pretty hard, especially if you haven’t played these kinds of games before. I tried to signpost the puzzles well, but I may have failed at times. Or maybe you don’t have tons of free time to walk around and figure things out! So without further ado, here are some hints. Highlight/select each bullet point to get ever more “spoilery ” hints about a problem.
Hints
How do I get the story started!?
- How do I get the story started!? Take that todo list on your wall!
How do I change from day to night?
- Go to bed (assuming you don’t have anything to do, and aren’t stressed out by anything)
I want a listening device!
- You were gonna get one via mail order, but you procrastinated. Look around your cabin.
I want something to see in the hole!
- Well, your lantern might help a bit. But…
- You really want something better. You were so distraught after the incident with fido and the tree, that you failed to notice something on that darned tree. Easier to see in daylight!
- I wonder who put that there? Maybe they had a way to view pictures too.
How do I carefully lower things down the hole to explore it?
- There’s another thing that has stuff lowered into it. Parts of it are broken, could be useful.
- It’s the crank on the well! And it fits over the hole.
- You’ll also need something under your front porch.
- It’s a spool of fishing line! Look at the crank and the spool in your inventory.
I need a stamp!
- Check your mailbox.
- Postcard. And it didn’t get postmarked!
- Remove it from the postcard. Carefully…
- With some heat.
- By heating your iron on the stove.
I need some cash!
- Did you find a note from your neighbor?
- The note blew into the stump you tried to pull.
- Who stole the cash? Where is this squeaky thief now?
- The thief has a little hole on the top right of his screen. It’s in there.
How do I get gas for the truck?
- Make sure you have performed your other tasks first.
- Have you lowered both a mic and camera? Did something happen afterwards?
- One of those things that “happened” might be the tractor’s gas tank. It landed nearby.
- Might be easier to find at night. What was attracted to the colors on the tractor?
- THE ANSWER:
- The fireflies show where it is in your front yard at night.
How do I get the truck keys?
- They’re on the same screen as the truck.
- At night is a good time to see them with your lantern.
- They’re in the well. Oh, but they’re just out of reach.
- They float (wooden keychain). Change the water level in the well?
- You’ve got a container that can carry liquids, don’t you?
Some other questions:
What’s that little mouse for?
- It’s leading you to something. Might make more sense if you found your neighbor’s note. Which blew onto your property…
- into your stump.
What are those black shapes I see sometimes at night?
- I dunno… it’s a mystery?
That pile of rocks? Any purpose?
- It’s just fun to throw things in the hole I guess.
Is there any purpose to the fireflies?
- Yup. They subtley hint at something which is important later in the game.
What’s the deal with the hole? Who made it? What’s in there?
- Haha, nice try. What’s in there? Well, (most of) your tractor, for starters. Maybe you’ll have to play Cascade Quest to find out more.
Posted on May 23, 2017
Fast palette lookups
Cascade Quest uses a fixed palette that is based of the 16 default EGA colors. The 16-color Sierra games used dithering to give the appearance of more than 16 colors. Given the relatively blurry monitors and TVs of the day, this produced a more convincing effect than it does on modern crisp LCD monitors. As a result, Cascade Quest uses the “undithered” versions of these dithered colors. That is, each base color blended with every other base color. This results in the palette on the left below. Note that due to duplicates, the result is 136 unique colors (16 + 15 + 14 + …. + 1), not 256.

16 color EGA palette on the right. Cascade Quest’s undithered palette on the left.
Using any limited-color palette (with arbitrary colors like VGA, or fixed colors like mine) presents some pretty significant limitations. The most obvious is that blending two colors together becomes much more difficult. We need to take the two RGB values, combine them, and then map this color back to the closest matching color in our palette.
Rationale
The brute force method for palette lookup is to calculate the euclidean distance between the reference color and each other entry in the palette. The closest one wins.
This is brute force approach is fine to do in the case of a simple remap of each palette index to another – for instance, Cascade Quest does this to support automatically darkening (for sprites in shadow) or converting sprites and backgrounds to a certain lighting setup. These are fixed “remaps” that only need to be calculated once at startup.
However, it is much too slow to do on a per-pixel basis. We need per-pixel blending to support high quality scaling and pseudo alpha-blending. Below is an example of a mushroom. The original image is on the left. In the middle is what happens when you scale it to 73% of the original size using nearest neighbor sampling. This is what Sierra’s SCI1+ engines used for scaling, since it’s quick and you are only ever dealing with existing colors in your palette (SCI0 did not support scaling). On the right is a version that is scaled using bilinear filtering, with the resulting colors remapped to the palette.

You could argue that the middle mushroom is more true to the retro aesthetic (but the right-hand one is clearly a more accurate representation of the mushroom). However, look what happens when you have an image with high frequency details:

All the bars have gone missing in the center image, since the nearest neighbor sampling at that zoom level ended up sampling only the white pixels. On the right is the result using bilinear filtering and remapping to the palette. When the scaling level changes smoothly in game, the problems with nearest neighbor sampling become even more distracting.
Initial approaches
How can we more quickly map an arbitrary RGB value to a palette index? We could generate a lookup table. However, to do this accurately, we’d need an entry for every possible color: more than 16 million of them! For optimum speed, whatever lookup table we use needs to be small enough to fit well within the processor’s L1 data cache so that memory access doesn’t become a bottleneck. A 16 megabyte array doesn’t fit the bill.
We could of course just make the grid coarser. Instead of 256 values for each RGB component, we use quantize to 16 or 10 or whatever. Once we do this however, we start to significant amounts of incorrect results.
We can perhaps produce more intelligent quantization. If we look at all our palette colors, the combinations are such that there end up only being 10 unique values for each RGB component (in fact, the same ones for each component). This is a property of the source colors we are using, and wouldn’t be true for an arbitrary palette of course.

In the above image, I’ve drawn in grey lines halfway between the 10 possible component values. We can define buckets between each of the grey lines (a total of 10 buckets). Those buckets have the property that any component value that falls within them will have the contained value (black line) as the closest color component. So we end up with two lookup tables. One (of size 256) maps a single RGB component to a bucket. And the other (of size bucketCount ^ 3, or 1000 in this case) maps the three buckets (R, G, B) to an actual palette index. Of course, we also have to do a one time pass to calculate the closest palette color for each bucket.
So, this would actually work perfectly if our palette contained every combination of those 10 discrete values (10 * 10 * 10 = 1000 palette entries) – but it of course doesn’t. As a result, it falls apart quite spectacularly. We can precalculate the nearest palette index for a particular (R, G, B) bucket, but the actual nearest color to any arbitrary (R, G, B) value in that bucket might be different (again, this wouldn’t be an issue if our palette had every combination of our 10 discrete component values).
I thought it would be useful to visualize my palette’s color distribution, so I put together a quick Unity scene that shows the RGB color space and where each palette value is within it.

Looking at a 2d cross section also helps. Here’s looking along the blue axis (thus we see the red and green distribution:

Getting it done
Once I realized that a perfect solution to this problem is probably not possible, I set out to do the best I could. To get more concrete results, I came up with a random test corpus. 1000 randomly chosen colors. They aren’t completely random though. Instead, they are random blends of two randomly chosen palette colors. This results in a color corpus that is closer to what might be actually used in the game for blending operations.
For this corpus, the bucket method described above resulted in 349 of the 1000 colors being incorrectly matched. Pretty bad – in fact, barely better than using an even distribution. I tried doubling the resolution of the buckets. That improved the wrong matches to 215 out of 1000. But at the expense of a bucket lookup table of 8000 entries (20 * 20 * 20).
I then tried some even distributions. Everything from 10 evenly distributed buckets to 20. While generally using more buckets reduced the number of mismatches, the relationship wasn’t monotonically increasing. Fifteen buckets proved to be good bang for the buck (et) – 234 mismatches, which ended up being fewer than with 16 or 17 buckets.
Still sure that a specific bucket distribution could produce better results, I threw some computational power at the problem. I tried lots of slight variations for the boundaries on each bucket. This ended up in finding a bucket distribution that results in only 149 mismatches out of the 1000 color corpus. Not too shabby.
So the approach I’m using (for now), maps each RGB component to a bucket index. Then the bucket index is used to index in the main lookup array (15 * 15 * 15 = 3375 entries).
Where is this used
I use this quick lookup for alpha blending and bilinear filtering during scaling. However, I use the slower accurate version for the global color remapping, since this is only done once at startup and only needs to evaluate 136 unique palette colors.


Outhouse appears from thin air
Performance
I timed the drawing performance of the above outhouse alpha blending cycle. The frame draw times for the outhouse were:
- Alpha blended, using the slow (correct) palette lookup: 13.3ms
- Alpha blended using the quick lookup: 0.3ms (44 times faster)
- No blending: 0.03ms.
I also tried seeing if the size of the lookup table made a difference. That is, 10 buckets instead of 15. It did not (though I’m sure increasing the number of buckets would start to slow things down).
A note on gamma-correctness
I’ve been ignoring this throughout this post, but it’s an important bit to touch upon. The base EGA colors are in gamma-corrected space. That is, those values are exactly what is displayed on the monitor. To properly combine them (to get our 136 color palette) so that they look just like the dithered colors, we need to convert them to linear, take the average of the two, and then convert back to gamma space. If we don’t do this, things will look significantly different.

Dithered color combinations with and without proper gamma correction.
Now, this should also be done when blending. I don’t do this (I just directly blend colors in gamma space) for a few reasons though:
- It would be slower, since we need to do the conversion to linear and back for every pixel
- The resulting colors will already be wrong anyway, since we’re mapping to our fixed palette. So the “perfection” won’t be noticeable.
- Older graphics hardware has gotten away with not doing this for texture filtering (although in general modern graphics hardware does this properly).